Adding a domain

Written by Tatiana Nik
Updated at April 14th, 2026
Table of Contents
How to add a domain to your account
To add a new domain to your profile, follow these steps:
1. Go to the "Domains" section of your profile.
2. Click the "Create domain" button.
3. Specify the desired domain name and confirm the creation by clicking the “Add domain” button.
4. If you want to add several domains at once, click the “+” icon, enter all the required domain names (one per line), and complete the process by clicking the “Add Domain” button.
The next step is to connect an SSL certificate via the CloudFlare service.

How to connect an SSL certificate via CloudFlare
Adding a website to CloudFlare
After this, you'll be taken to the admin panel. Now we need to connect our website to Cloudflare. To do this, enter your existing domain in the "Enter an existing domain" field.

Leave the "Quick scan for DNS records" field selected. Cloudflare will scan for common DNS records and import them for you. Click "Continue."
Select the free plan and click the “Continue” button:

CloudFlare will then start scanning your domain's DNS records and automatically add everything it finds.
DNS records are records with data about which servers to send requests to when your website is opened, and some other things.
Now you need to check them, and if everything is ok, click on the “Continue” button:

 This orange cloud means that requests for your domain or subdomain will be routed through Cloudflare servers. Without this, Cloudflare's free SSL won't work. This is useful because it hides your server's address, making it harder for attackers to target it.
In the Content field, replace the current value with the IP address that is displayed in your personal account in the domain adding window in MVP Project (CNAME field).

If the DNS record scan fails, you will unfortunately have to add these records manually using the “Add record” button.
If you had a scanning error or want to check if all records were transferred correctly, here's how to do it:
Go to the service where your DNS records are currently located . This is usually either where you registered the domain or on your hosting. You can find out exactly where by going to where you registered the domain and looking at the DNS servers (sometimes called NS servers) listed there. For example, I registered this domain on the Webmoney Domains website. There, I go to "My domains and services" and click "Domain management" next to my domain. Then I click the "DNS servers" link and see two: "ns1.timeweb.ru" and "ns2.timeweb.ru." This means my DNS records are on TimeWeb hosting.
Find the list of DNS records. Usually, it's somewhere in the domain settings. I have them on Timeweb hosting, so I go to my admin panel, go to the "Domains and Subdomains" section, and see the list of domains there. Next to the domain, click the gear icon and then "DNS Settings": And there they are! The DNS records:

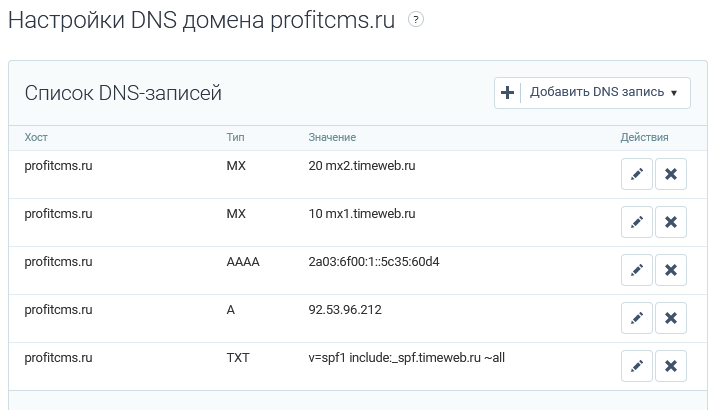
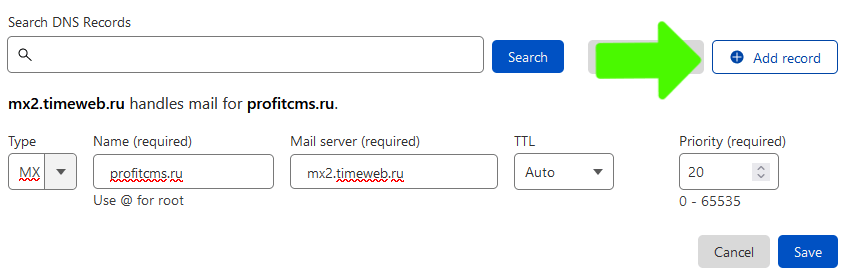
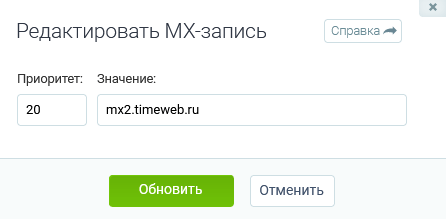
Check that CloudFlare has found all the records and add any missing ones. Most records have only three fields: Type, Name, and Value. Sometimes there are Priority and other fields. To add a record to CloudFlare, click "Add record," and the following form will open: Type is the type. Select it from the list. Name is the name (in TimeWeb, this column is called "Host"). The following fields vary depending on the record type. I'm copying the first record from the screenshot above, and its type is MX. It has two settings fields: Mail server and Priority. I clicked the edit icon next to the record in TimeWeb and saw these two fields, "Priority" and "Value." After that, I copied "Priority" to "Priority," "Value" to "Mail server," and "Host" to "Name." If I copy records like "A" or "AAAA," I'll need to copy what Timeweb calls "Value" to the "IPv4 address" field on CloudFlare. As you can see, it's not very simple, but not very difficult either. The records don't have very many fields.
Turn on Flexible
Go to the SSL/TLS - Overview section, in the SSL/TLS encryption tab, go to Configure.

Then, in the Custom SSL/TLS tab, enable Flexible and save the changes.

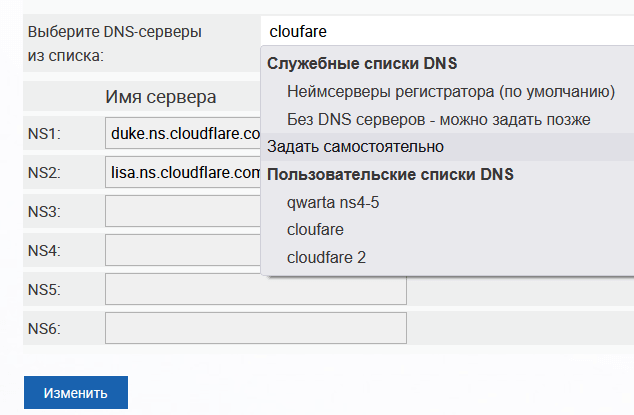
Changing DNS/NS servers for a domain
Are your DNS records all set up now? Great! Let's change the DNS servers from the old ones to the new ones:
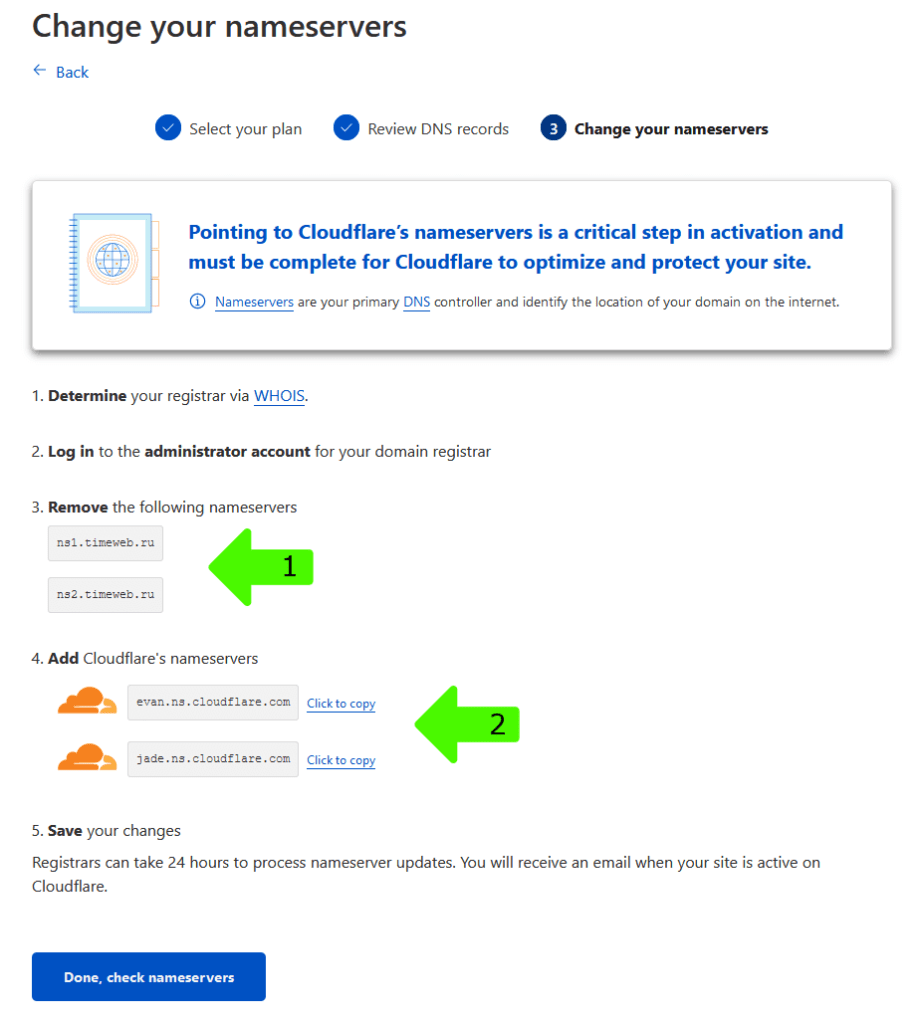
We need to replace the servers pointed to by arrow #1 with servers from CloudFlare (arrow #2).
To do this, we need to go to where you registered the domain. In the domain's settings, find the Nameserver or DNS server and edit them. Or delete them and add new ones.
To do this on my “WebMoney Domains,” you need to go to “My domains and services,” click “Edit” next to the desired domain, click on the “DNS servers” link, and then select “Set manually” from the list. Then you can change them:
After this, you may sometimes need to wait up to a day for these changes to take effect.
Why not instantly? The thing is, this data is copied by a bunch of servers to ensure your site opens quickly across the globe. And you have to wait for them all to update the data. And that takes time.
After changing the servers, click the blue button “Done, check nameservers”.